07. Template and Software
Template and Software
Data Wrangling Template
As we go through this walkthrough, we’ll use a tool called a Jupyter Notebook to help organize our thoughts. I’ve created a template notebook for data wrangling, with sections marked off for each step of the process.
This template will be used throughout the lesson via Jupyter Notebook Workspaces in the classroom, like below. If you want to work with this template in your local environment or use it for future data wrangling efforts, download it from the File menu directly in the Jupyter Notebook workspace below.
Workspace
This section contains either a workspace (it can be a Jupyter Notebook workspace or an online code editor work space, etc.) and it cannot be automatically downloaded to be generated here. Please access the classroom with your account and manually download the workspace to your local machine. Note that for some courses, Udacity upload the workspace files onto https://github.com/udacity , so you may be able to download them there.
Workspace Information:
- Default file path:
- Workspace type: jupyter
- Opened files (when workspace is loaded): n/a
What is a Jupyter Notebook, you ask? This is good segue to the software we'll be using in this course.
Software
Jupyter Notebook
A Jupyter Notebook is a web application that allows you to combine explanatory text, math equations, code, visualizations, and more all in one easily shareable document. Notebooks have quickly become an essential tool when working with data, especially for wrangling and the tasks involved.
Jupyter Notebooks were originally known as IPython notebooks, and when you download one of these files, you’ll see it has an .ipynb (IPython notebook) extension.
If you're unfamiliar with Jupyter Notebooks, check out Mat's excellent Jupyter Notebook tutorial earlier in the Nanodegree program if you're enrolled (or this one on YouTube if you're not ) before continuing on with this course.
Again, Jupyter Notebook Workspaces will be present throughout the course. These Workspaces are virtual machines and each student has their own. That means the code you write will be there for you after you leave and come back to the classroom ( as long as it is saved before you leave, whether automatically or via command- or control-S ). I have configured each Workspace with starter files to set up programming quizzes, which means your work in one notebook won't carry over to the next.
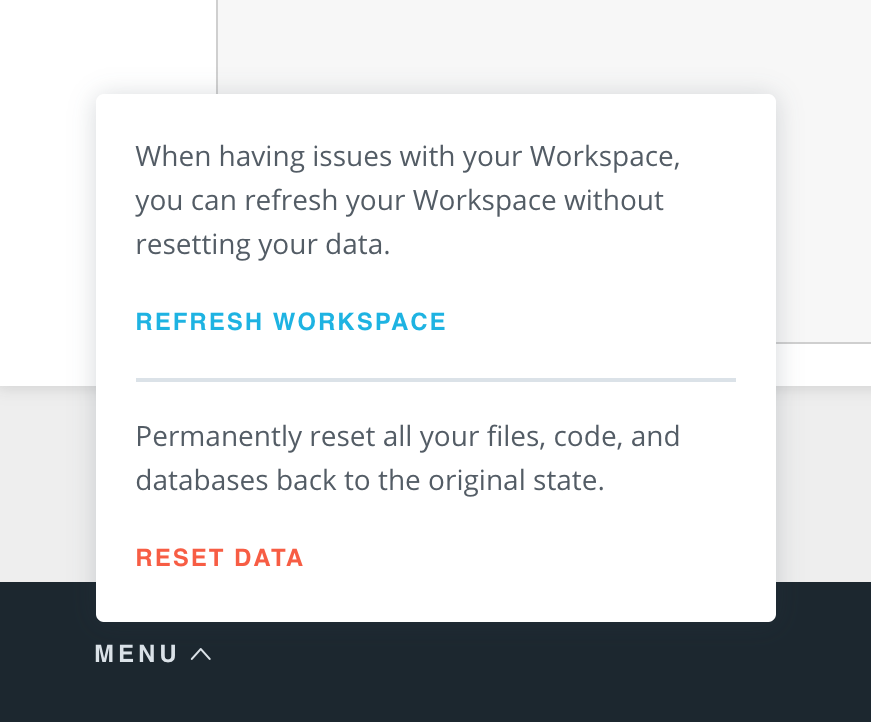
If your code or Workspace isn't behaving as expected, hover over Menu in the bottom lefthand corner of the Workspace, then click Refresh Data or Reset Workspace , as displayed in the image below. Refresh Workspace is essentially harmless in terms of your work, whereas Reset Data starts everything over with fresh starter files and all of your progress to date is thrown away.
Anaconda
In his lesson, Mat writes "by far the easiest way to install Jupyter is with Anaconda." Anaconda is a distribution of packages built for data science. Because of the Jupyter Notebook Workspaces in the classroom, setting Anaconda up on your computer isn't absolutely necessary for this course, but we still recommend that you do so. In his Anaconda tutorial, Mat describes how Anaconda will make working with data outside of this course "1000 times better" and how to set it up. If you aren't enrolled in the Nanodegree program, try this Anaconda installation tutorial on YouTube .
You can also install Jupyter from the command line using
pip
:
pip install jupyter notebook
if you don't want to use Anaconda (we recommend that you do, though).
pip
is a package management system used to install and manage software packages written in Python.